Types of Phoneme Blending for Early Readers

One of the most crucial skills for kids learning to read is learning how to blend phonemes. This is a foundational skill that not only relates to spoken language but also the ability to decode and comprehend words in text. 

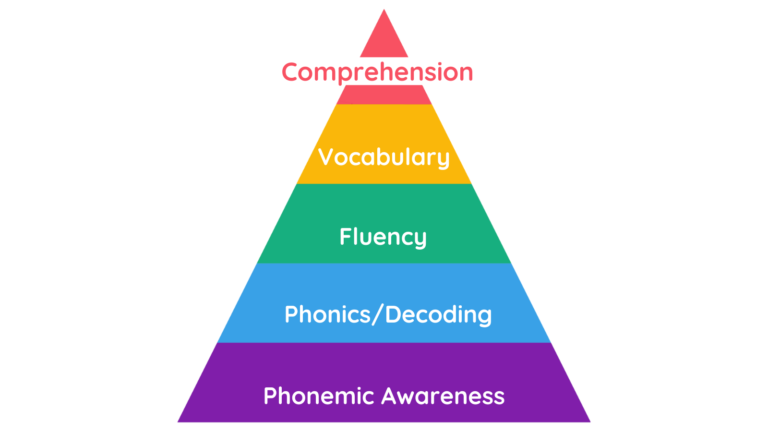
Phonemes are the individual sounds that make up spoken language. In English, there are 44 blendable phoneme units out of the 26 letters of the alphabet. For students to begin blending sounds into words, they first need an understanding of letter-sound correspondences. 

When a child knows some letter-sound correspondences, it’s time to introduce blending! To help your new reader make sense of words in print, here are several types of phoneme blending techniques to consider. 

Segmented Blending 

One well-known form of phoneme blending taught during phonics instruction is called segmented phonation, also known as final blending. This is when children read a word by sounding out each letter sound from left to right. There is typically a pause between each sound. The sounds are blended together at the end of the word. 

Here’s what segmented blending would look like in practice.

You’re helping a child blend the word, ‘sit.’ 

The child sounds out each letter individually and pauses between each sound:

/s/ (pause) /i/ (pause) /t/

Then, the reader brings the letter sounds closer together: /s/ /i/ /t/.

The three sounds are held in the child’s memory and blended or put together at the end of the word. 

Continuous Blending

Continuous blending—also known as connected phonation—is the most straightforward type of phoneme blending. It works by blending letter sounds smoothly and continuously without stopping in between sounds, as you would with segmented phonation reviewed above.

Here is how a child can practice continuous blending:

The child is reading the word ‘ran.’

They sound out each letter sound slowly, continuously, and smoothly:

/rrrr/ /aaaa/ /nnnn

Sometimes the child may need to repeat the process with an increased pace. Typically, immediately after continuous blending, the child can understand the word: ‘ran.’ Continuous blending is known to be an easier form of phoneme blending for kids, as it’s closer to how humans naturally speak. In comparison, segmented blending requires more working memory of phoneme sounds, making it more challenging for some kids.

This type of phoneme blending is typically first introduced with letters that make continuous sounds. These are sounds that can be held longer like /mmmm/ or /ssss/. Some phonemes are ‘stops’ that can’t be elongated like /p/ or /g/. It is difficult to use continuous blending when those sounds appear at the beginning of a word. Phonemes that work best for introductory continuous blending include /m/, /n/, /s/, /l/, /f/, /r/, /v/, and /z/.

Successive Blending (Additive Blending)

Successive or “additive” blending is a slightly different approach to blending. Instead of sounding out a word all the way through, letter by letter and then repeating the whole word, successive blending repeats each blended portion of the word before the following letter is sounded out. 

Here’s how it’s practiced:

The child is sounding out the word ‘slip.’

First, start with /s/.

Then, restart from the beginning of the word to sound out /s/ and /l/ together to make ‘sl’.

Next, go back and repeat ‘sl’ while adding /i/ to the end: ‘sli’.

Finally, formulate the whole word by saying ‘sli’ once again and adding /p/. You then say the whole word, ‘slip.’

This method particularly helps struggling readers who have difficulty retaining which sounds they sound out during blending. It helps them remember and integrate all of the sounds in a word, instead of getting lost in the middle or the end of the word and forgetting what they sounded out. 

Onset and Rime Blending

Onset and rime (also called onset-rime) blending separates words into its onset (the beginning consonant or consonant blend) and rimes (the vowel plus any other remaining consonants in the word). In this approach, readers sound out the onset and then blend it into the rime. 

For example:

To blend the word ‘can,’ the reader first sounds out the onset /c/ and then the rime /an/.

Then, they blend them together: /c/ + /an/… ‘can.’

The onset-rime blending method is ideally used as a supplementary practice to phoneme blending, not the main approach. 

Onset-rime blending can be confusing. It might give early readers the impression that words are made up of smaller word sections when really words are made up of individual sounds (phonemes) strung together. 

For example, imagine a child is learning to read the word ‘right.’ The onset /r/ plus the rime /ight/ involves more complex phonics rules that some children would struggle to discern with this method. Additionally, there are more than 300 rimes (also known as word families) in the English language. It would take much more cognitive effort to memorize these rimes than to blend individual sounds.

In many cases during onset-rime, the initial consonant spoken by itself sounds distorted or is spoken with an added schwa sound. The phoneme for the letter <d>, for example, should not be pronounced ‘duh’ as it could distort the rime that follows. You wouldn’t say, ‘duh-im’ for the word ‘dim,’ but a child is likely to make this mistake when using the onset-rime method.

Body-Coda Blending

Another type of phoneme blending that involves separating words into segments is called body-coda. First, readers sound out the body (the consonant and vowel) and then the coda (the final consonant or consonant blend). It’s the reverse of onset-rime.

For example: 

When blending the word ‘cat,’ the reader sounds out the body of the word ‘ca’ and then the coda /t/. 

Then, they blend them: /ca/ + /t/… ‘cat.’ 

The body-coda method is often easier than the onset-rime method. If children can practice the beginning consonant, they can use continuous blending to finish reading the word—for example: ‘caaaaa-t.’ Because vowels are always continuous sounds, the body-coda method helps kids overcome and automate the difficult part of blending, which is knowing how to put a “stop” sound (consonant) with a vowel sound together. 

Just like onset-rime, the body-coda blending method can reinforce the concept of “word chunks” rather than the importance of actual phonemes. Therefore, it should also be a supporting technique and not the initial or primary one.

Best Ways to Teach Phonics to Early Readers

Blending is an essential phonics skill for children learning to read. While there are several types of blending practices to introduce in phonics instruction, several methods have been shown to work better than others. 

Continuous blending is the most effective type of phoneme blending as it is most similar to how we naturally speak words. Segmented blending is also a reliable method for many children learning how to read, although it may be difficult for students who struggle with working memory. 

For more tips and information on teaching phonics effectively to kids, read more insights from phonics.org.

Classroom Phonemic Awareness Activities for Kids

Before learning to read, children must understand their spoken language. The first step in understanding spoken language is becoming aware of the different sounds that words contain within that language.

This is called phonemic awareness—one of the most important concepts in early literacy education. 

To help young learners achieve necessary milestones on their way to reading readiness, an understanding of phonemic awareness is crucial. 

Whether you’re new to this concept or simply want a refresher, here’s an overview of phonemic awareness for phonics instruction. We’ll also share some fun classroom activities that improve this important skill!

Phonemic Awareness: The Building Blocks of Phonics

Young children inherently learn that spoken language is made up of verbal sounds. As they build phonemic awareness during their first years of development, children learn many individual sounds that can be combined to form specific words. 

Building on this awareness, children begin to learn what certain words mean and then gradually use learned words to express themselves and communicate. 

Children build phonemic awareness over time in the presence of fluent adults and family. While language development happens naturally for most children, the phonics skills required for reading and writing must be explicitly taught. 

Therefore, phonemic awareness is the foundation of the reading pyramid:

There are proven activities that educators and parents can use to support phonemic development.

Activities to Strengthen Phonemic Awareness in Phonics Education

While phonemic awareness starts in early childhood development, direct instruction (and lots of practice) helps kids apply these skills toward phonics learning. 

Some children start learning phonics as early as three years old. Many, however, start learning once they enter kindergarten. Whether your little learner is in daycare, preschool, or kindergarten, you can give these activities a try!

1. Rhyme Scavenger Hunt

Rhyming is a crucial skill when it comes to phonemic awareness. To help kids identify and come up with words that rhyme, have a “rhyme” scavenger hunt.

  1. Create a list of classroom items you’ll use in the scavenger hunt. 
  2. Come up with words that rhyme with each item. These words will be the students’ scavenger hunt clues.
  3. Share the rhyming clue out loud then have students guess the answer. Let them get up, walk around, and physically “hunt” for the item they think rhymes with the clue.
  4. Every time students identify the correct item, have them raise their hands to guess what other words rhyme with it.
  5. You can also play this fun activity outdoors for an added challenge.

2. Sort Out the Sound

Engaging kids in sound sorting is an effective phonemic awareness activity. This helps them identify beginning, middle, and end sounds.

  1. Give students a sheet of paper that has pictures of different objects such as dog, duck, pig, pale, rock, and sock.
  2. Let students cut out each item.
  3. Instruct students to sort their cutouts based on the sounds you say. For example: “the beginning sound is /d/” or “the ending sound is /ck/”.
  4. Review students’ guesses and correct them when necessary.
  5. Repeat until all the sounds have been sorted.

3. Clapping Through Syllables

For syllable awareness, you can have children use their bodies to emphasize how many syllables a word has.

  1. Have students respond to words you say by clapping their hands for each syllable in each word.
  2. Repeat each word several times as a class, changing the speed from slow to fast.
  3. You can also change it up with stomping, jumping, or dancing.

4. Letter Mystery Bag

Help your students practice sound placement with this fun, interactive mystery bag!

  1. Place a bunch of toy letters in a bag. They can be foam, plastic, or wood.
  2. Have each student take turns reaching into the bag without looking. Whichever letter they pull out, ask them to make the sound that letter makes.
  3. Then, have the whole group repeat the letter sound.
  4. You can also have students pull out multiple letters in a row and see if the class can make a word from those letters.

5. Head-to-Toe Word Syllables

Get some movement in while practicing word segmentation for phonemic awareness.

  1. Explain and demonstrate the activity: students will touch parts of their bodies to show parts of a word.
  2. Beginning sounds = head.
  3. Middle sounds = hips.
  4. End sounds = toes.
  5. Say a word, such as “popsicle.”
  6. Have students repeat the word as they break up its syllables head to toe. 
  7. For “popsicle,” children touch their heads for /pop/, their hips for /sih/, and their toes for /cull/. 

6. Guess the Rhyme I’m Thinking Of

Have the class guess which rhyming word you’re thinking of.

  1. Give the class a rhyming clue: “I’m thinking of a word that rhymes with cat.”
  2. Let students guess the rhyming word, popcorn style.
  3. Feel free to use nonsense words for fun! For example: “I’m thinking of a word that rhymes with zoodle!” for the word “noodle.”

7. Make Sounds in a Mirror

For young children, making words in a mirror can be a fun activity at any time of day.

  1. Place a small mirror in front of the child.
  2. Ask them if they can repeat a word while making the funniest, most dramatic pronunciations with their face. Show them an example to begin with. 
  3. Talk about what the tongue and lips are doing while making a certain sound. 
  4. Have fun being goofy together and watching how words are formed!

8. Tongue Twisters

Tongue twisters are a classic way to get kids thinking about phonemes and pronunciation. 

  1. Find skills-appropriate tongue twisters to try with the class.
  2. Practice each one through “repeat after me,” call and response, and recite from memory.
  3. Use this list of tongue twisters for plenty of ideas.

9. Sound Monsters

Make phonemes so playful that kids look forward to practicing every day. The sound-eating monster is a classroom favorite.

  1. Make several cute monsters using shoe boxes (for the body and mouth) and craft supplies (for the eyes, spikes, and facial features). 
  2. Explain how the Sound Monsters need to be fed every day. Sometimes the monsters have an appetite for different types of sounds, so the class needs to be careful which sounds in words they choose!
  3. Each day, get the class excited to “feed” the monsters. Rotate which students get to feed them so everyone has a turn throughout the week.
  4. Provide a bunch of notecards with pictures or words, such as baby, ball, apple, frog, etc.
  5. Choose which sounds a specific monster wants that day and act it out for the class. “Today, this Word Monster wants to eat the sound, ahhh.”
  6. Have students select notecards that contain words or pictures with the correct sounds.
  7. Make it fun and mix up the phonemes to make it challenging: “Today, this monster wants to eat the beginning sounds shh and sss.”

10. Simon Says Blending

Phoneme blending is one of the most important phonemic awareness skills students can have when learning to read. 

  1. Tell the class you will play Simon Says, a game where the teacher asks students to do an action, but only if they hear “Simon Says” first. 
  2. Instead of saying the action word, say all of the sounds in the word and ask students to blend the sounds to figure out the action. For example, “Simon says /s/ /i/ /t/ down” or “Simon says /j/ /u/ /m/ /p/ up!”
  3. Mix up the gameplay by asking one of the students to be the new “Simon”. 

Classroom Reading and Phonics Apps

Using technology in the classroom is helpful for digital native learners. In addition to these fun group activities, consider classroom reading and phonics apps that include phonemic awareness exercises.

Explore phonics.org to learn more ways to strengthen your students’ phonemic awareness. Find some of the best early phonics programs on the market today!